Bitmovin Integration
Bitmovin is a multimedia technology company which provides services that transcode digital video and audio to streaming formats using cloud computing and streaming media players.
The platform supports direct input and output from S3-compatible storage systems, making integration with Tebi especially easy.
Let’s encode this sample video file stored in Tebi Storage into a few different formats using the Bitmovin cloud encoding platform.
Prepare Your Tebi Account
Create a bucket that we will use to store our encodings. Bitmovin will write them directly into this bucket. Let’s name it bitmovin-test.
We suggest both creating a separate key that will be used for Bitmovin only, and allowing limited access to the bitmovin-test bucket. Additionally, let’s limit this key to only S3 protocol and Upload actions. This way, we will limit the possible amount of damage that could occur if this key becomes exposed.
Open bucket preferences and select the Access Keys tab. Click the Add button next to the New random key dropdown. Next, make sure that only the S3 protocol and Upload action checkboxes are selected. Save the form by pressing the Update button at the bottom of the page.
If you plan to play your stream in the web player from a different domain, enable Cross-Origin Resource Sharing (CORS) to allow your web-browser JavaScript code to access resources located in your bucket. To do this, open bucket preferences, select the CORS tab, and check the Enable checkbox to enable CORS for all domains. Leave the XML textbox blank. Now, save the form to apply changes. You can read more about Bucket CORS here.
Bitmovin Setup
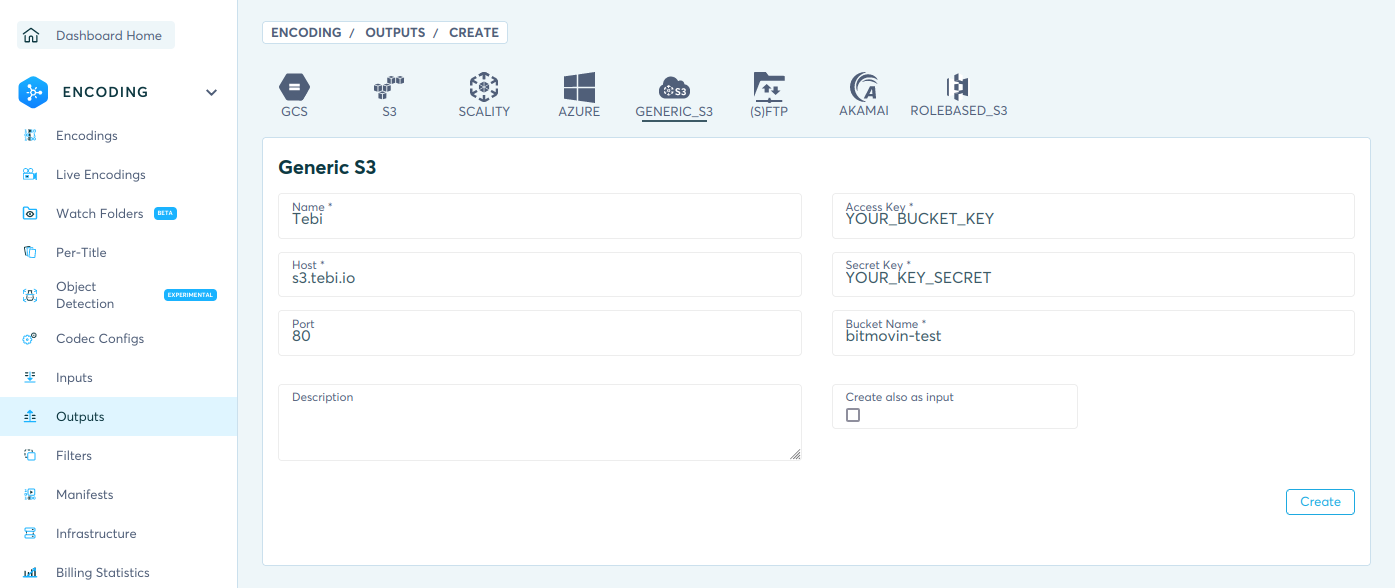
Open Bitmovin Dashboard and go to Encoding. Select Outputs and click on the + Create button to add Tebi as an output destination for encoding results. Select the Generic S3 option from the top of the form and complete the fields:
Name: Your Output name. For example,
TebiHost: Tebi S3 API endpoint
s3.tebi.ioPort: The default HTTP port is
80Access Key: Key that you created specifically for Bitmovin earlier
Secret Key: Secret part of the key
Bucket Name: Enter the bucket name that you created earlier, e.g.
bitmovin-test
Next, go to ENCODING and select Encodings from the navigation menu on the left. This will open your encodings list page. To start a new encoding, press the + Create new encoding button. A wizard page will appear with 6 simple steps:
Step 1: Insert the example stream URL (<https://s3.tebi.io/test/examples/bbb_1080p_30fps.mp4>`_) or any other video URL into the
Select InputOwn Streamfield.Step 2: At the next step, choose your
Video Representations. For simplicity, it is recommended to keep the default settings for now.Step 3: Keep
Audio Representationsat default setting and clickNext.Step 4:
Muxing / Manifestallows you to create MPEG-DASH and HLS ready streams. Keep them selected.Step 5: Now, you must select the
Tebioutput from theOutputs Listin theSelect Outputsection to save encoded videos directly into Tebi storage. Puttestpath into theOutput Pathfield down below, as this field is required.Step 6: Press the
Start Encodingbutton to start the process.
It will take just a few minutes to complete encoding. After that, you will find all your encoded files in your bucket’s test directory, specified in Step 5.
Note
This documentation is designed to be as simple as possible to get you started with Bitmovin service and Tebi Cloud – there are many more options available to cover all possible use-cases. Please contact our support team if you need any additional help.